
Ever come across a lace pattern that you fell in love with, but didn’t have the recommended thread size handy? I know that feeling all too well. This is where resizing the pattern comes in handy.
But before we get started with the heavy stuff, I want to thank the thousands of lacemakers from 51 different countries that visited my blog last week. Thanks for your comments, feedback and encouragement. Please accept my apologies if I do not always respond to your comments or queries – as I have a very busy work program. However, I love reading your comments and feedback, and I am learning a lot in the process.
So, let’s get started. There are at least four reasons why you might be interested in learning how to resize a pattern:
- Whilst preparing a pricking, you realise that when you copied (or scanned and printed) the pattern, the copier/scanner distorted the image.
- The pattern recommends that you use, let’s say, Egyptian Cotton 70/2. All excited, you dig through your stash of thread only to discover you have Egyptian Cotton 60/2, but not 70/2.
- You fall in love with a particular thread and you just HAVE to use it. There’s only one small problem. The pattern you have calls for a different thread size.
- You need the finished product to be a particular size, but the pattern dimensions will result in the finished item being larger or smaller than required. For example, you have a beautiful frame that you want to use for mounting your lace. The frame will accommodate a piece of lace that is a maximum of 15cm x 15cm, but the pattern is designed to yield a finished product that is 18cm x 18cm.
Resizing your lace pattern is an easy solution to these problems.
Last week I thought (somewhat ambitiously) that I could write one blog post about how I resize a pattern – to address all four these problems. But once I started typing it all up I soon realised that it would just be way too much information to digest and that it could be a bit overwhelming for you to read.
So, I went back to the drawing board and decided that today’s post will be all about how I resize a pricking to compensate for copier/scanner distortion. Let’s call this Part 1.
Next week, in Part 2, I will provide a guide to resizing a pattern if you want to use a thread size that is different to the thread size that is recommended for the pattern.
Five steps that I use for resizing a bobbin lace pattern to compensate for copier/scanner distortion
Whenever I prepare a pricking, I prefer using a copy rather than pricking through the original pattern. (I can’t bear the thought of pricking through an original!)
So, I either scan and print the pattern, or alternatively I make a copy of it.
Depending on the copier/scanner that you use, it may end up distorting the size of the pricking. By this I mean that the pricking is either slightly enlarged or slightly reduced in size (without any intention on your part to achieve that result.)
If this happens, the recommended thread size for that pattern may no longer be appropriate, and this may affect the appearance of the finished lace.
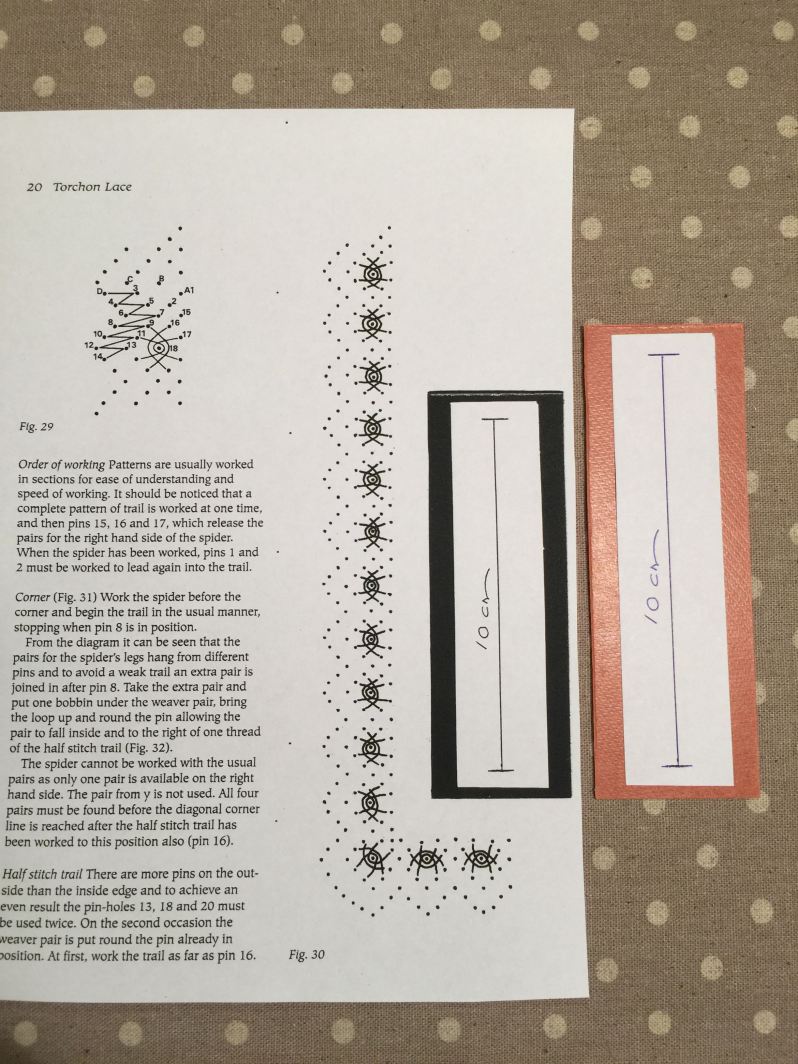
To safeguard against this, I always mark out a 10cm line on the pricking before making a copy/scanning and printing it. You don’t actually have to mark the original itself. (Again, I can’t bear the thought of making any markings on the pages of my lace books!) I typically use a small piece of white paper (say 12cm by 2cm) on which I mark out a 10cm line.
(Handy tip: You can laminate this little 10cm guide or paste it onto a piece of cardboard and cover it with Matt X-Film so that you can reuse it.)
Then, I place the guide next to the pattern before copying or scanning it.

Once I have made a copy of the pattern (or scanned and printed it), I measure the line to check whether it is still exactly 10cm long. If not, I know that the copier/scanner has distorted the size of the pricking.
If you want the pricking to be exactly the same size as the original (ie, a 100%), this means you will need to adjust your copier/scanner settings to achieve that result.
I will work through two examples to illustrate how I calculate the adjustment that needs to be made to my copier/scanner settings.
The first example illustrates what to do if the copying/scanning process results in an unintended enlargement of the pattern. The second example illustrates what to do if the copying/scanning process results in an unintended reduction of the pattern.
Example 1: unintended enlargement
Let’s say that after copying the pattern the guide line that originally measured 10cm, now measures 10.8cm. I appreciate that this may be an extreme example, but it illustrates the principles involved really well.

This is how I go about resizing the pattern:
Step 1: Calculate the percentage unintended enlargement as follows:
Divide the length of the guide line on the photocopy (10.8cm) by the length of the guide line on the original (10cm). So, 10.8cm divided by 10cm equals 1.08.
Step 2: Multiply the answer from step 1 by 100 to convert it to a percentage. So, 1.08 multiplied by 100 equals 108%. This means that the copying process resulted in the copy being 108% of the size of the original. So, there is an unintended 8% enlargement of the pattern (ie, 108% minus 100% equals an 8% enlargement).
Therein lies the problem, because you want the copy to be exactly the same size as the original (ie, 100% of the original).
Step 3: Calculate the adjustment that you need to make to the copier settings as follows:
Divide the length of the original guide line (10cm) by the length of the guide line on the photocopy (10.8cm). So, 10cm divided by 10.8cm equals 0.9259.
Multiply this number by 100 to arrive at a percentage. So, 0.9259 multiplied by 100 equals 92.59%.
Step 4: Round the % calculated in step 3 to the nearest whole percentage because most copiers will only allow you to enter whole percentages (in this case it is 93%).
Step 5: Set the copy size at 93% and make a copy of the original (and not the distorted copy!)
Based on the fact that the copier distorts the image by enlarging it 8% (as calculated in step 2), this means that copying the image at 93% will render a copy that is the same size as the original (ignoring the rounding in step 4).

Some lacemakers use a simplified version of this process. They reduce the copy size by the same percentage as the unintended enlargement. So, in our example, the copying process resulted in an unintended enlargement of 8% (calculated in step 2). They take the % unintended enlargement, and deduct it from 100%. The result: 100% – 8% = 92%. So, when they copy the pattern they set the copy size at 92%.
Mathematically this simplified method may not be 100% pure, but it provides a very good approximation of what the adjustment should be, provided of course that the copier/scanner distortion is not significant (less than 8%). But as soon as your copier/scanner distortion is 8% or more, this simplified method may not necessarily provide you with an accurate result. Always remember: the greater the copier distortion, the less accurate the simplified method becomes.

Example 2: unintended reduction
Let’s say that after copying the pattern, the guide line that originally measured 10cm, only measures 9cm. Again, I appreciate that this may be an extreme example, but it illustrates the principles involved really well.
This is how I go about resizing the pattern:
Step 1: Calculate the percentage unintended reduction as follows:
Divide the length of the guide line on the photocopy (9cm) by the length of the guide line on the original (10cm). So, 9cm divided by 10cm equals 0.90.
Step 2: Multiply the answer from step 1 by 100 to convert it to a percentage. So, 0.90 multiplied by 100 equals 90%. This means that the copying process resulted in the copy being 90% of the size of the original. So, there is an unintended 10% reduction in the size of the pattern [ie, (100-90)/100].
Therein lies the problem, because you want the copy to be exactly the same size as the original (ie, 100% of the original).
Step 3: Calculate the adjustment that you need to make to the copier settings as follows:
Divide the length of the original guide line (10cm) by the length of the guide line on the photocopy (9cm). So, 10cm divided by 9cm equals 1.1111.
Multiply the answer by 100 to arrive at a percentage: 1.1111 x 100 = 111.11%
Step 4: Round the % calculated in step 3 to the nearest whole percentage – in this case it is 111%
Step 5: Set the copy size at 111% and make a copy of the original.
Based on the fact that the copier distorts the image by reducing it 10% (as calculated in step 2), this means that copying the image at 111% will render a copy that is the same size as the original (ignoring the slight rounding in step 4).
The method described above is the mathematically pure way of doing it. However, some lacemakers use a simplified version of this process. They increase the copy size by the same percentage as the unintended reduction. So, in our example, the copying process resulted in an unintended reduction of 10% (calculated in step 2). They take the 10 % unintended reduction, and add it to 100% to work out the adjustment that needs to be made to the copy size. The result: 100% + 10% = 110%. So, when they copy the pattern they set the copy size on the copier at 110%.
As noted above this simplified method provides a very good approximation of what the adjustment should be if the copier distortion is not significant (less than 8%). But as soon as your copier/scanner distortion is 8% or more, this simplified method may not necessarily provide you with an accurate result. Again, the greater the distortion, the less accurate the simplified method becomes.
This method of resizing works for me and I hope it will for you.

I thought we all need a bit of colour and eye candy after this mouthful so here is a link to Letslace’s new Pinterest board – called ‘Lace – in paintings’. It shows the spectacular lace that was painted in previous centuries. Makes me wonder how lacemakers solved their problems in those days!
If you would like an email of my weekly post, click on Follow in the bottom right hand corner of this page.
See you next Sunday!

Great guide!
Thank you very much.
Thanks. This is great!
Many thanks
Very useful! And I like the cat!
I just have to say that your explanation and the directions, with the example, is pure genius. You have no idea of how much this has and will continue to help me throughout my lace adventures. I am fairly new to lace making, just started Torchon last March and I simply love it. I am so content with making lace. I already make knitted, crochet, tatting, needlepoint, and cross stitch and this is new to my collection of learning. I have two wonderful lace teachers, one teaching Torchon and the other Schneeberger. There is so much to learn in Torchon whereas Schneeberger seems to be much easier. The stitches are not my problem but working in the diagonal; for some reason I just can’t seem to get it right, but I will continue with great anticipation of getting it correct one day.
Your link and blog are just wonderful. I am so happy to see someone taking the time to explain tools, thread, prickings, and the very detailed explanations. Please continue with this as I am certain other newbies find this very helpful. God Bless
Hi Diana
Thank you for your lovely feedback, and for stopping by to read my blog. I am very pleased that you have discovered the joy of making bobbin lace. You are very lucky to have two wonderful lace teachers. Kind regards all the way from New Zealand.